The 7-Zone System
How to Set Up the Perfect Campsite Every Time
Stop the ‘dump and run’ chaos: Master the 7-Zone System for a stress-free campsite.
Affiliate Disclosure: Hey Reader! This post contains affiliate links. When you buy through our links, Pack & Pitch may earn a small commission, at no extra cost to you. Learn more here
As an Amazon Associate, we earn from qualifying purchases.
Understanding the basics of campsite setup can significantly enhance your camping experience.
We’ve all seen it happen.
It’s 5:00 PM on a Friday. A car pulls into the campsite. The doors fly open, and a family spills out. Gear gets dumped in a pile on the dirt. Someone starts yelling about tent poles. The esky is already buried under sleeping bags. By 6:00 PM, the tent is lopsided, the kids are crying, and dad is frantically searching for the gas regulator in the dark.
This is the “Dump and Run” method. The right campsite setup can make or break your outdoor adventure, and this approach is the fastest way to ruin it.
After years We’ve all seen it happen.
It’s 5:00 PM on a Friday. A car pulls into the campsite. The doors fly open, and a family spills out. Gear gets dumped in a pile on the dirt. Someone starts yelling about tent poles. The esky is already buried under sleeping bags. By 6:00 PM, the tent is lopsided, the kids are crying, and dad is frantically searching for the gas regulator in the dark.
This is the “Dump and Run” method. The right campsite setup can make or break your outdoor adventure, and this approach is the fastest way to ruin it.
After years of camping across Australia and New Zealand, from the windy cliffs of the Nullarbor to the sandfly-ridden rivers of the West Coast, I’ve learned that gear doesn’t make you a happy camper. Organization does.
Every successful camping adventure starts with an effective campsite setup.
I use a method called the 7-Zone System. It’s not about being a military drill sergeant; it’s about “Campsite Feng Shui.” It’s a logical way to arrange your site so you stay safe, comfortable, and, most importantly, relaxed. A well-planned campsite setup ensures you can enjoy nature without stress.
Here is the ultimate guide to setting up your campsite like a pro.
Phase 0: The Arrival (Look Up, Look Down)
Effective campsite setup requires foresight and planning. Before you unpack a single peg, you need to do a safety sweep. In Australia, this step can literally save your life.
As you arrive, your campsite setup should begin with a thorough inspection of the area.
Look Up: The Widow Makers Large Eucalyptus (Gum) trees are notorious for “self-pruning.” They drop massive, heavy branches without warning, even on still days. Remember that a solid campsite setup includes safety considerations. Never, ever pitch your tent directly under a large gum tree limb.
Look Down: The Ant Highway Successful campsite setup requires knowledge of the terrain. In Australia, Bull Ants and Jumping Jacks are aggressive. In New Zealand, you’re looking for uneven ground that will turn into a puddle if it rains. Spend 5 minutes walking the site. If you see a majestic mound of ants, move 10 meters to the left. It’s their house; you won’t win the turf war.
Prioritising your campsite setup can enhance your overall outdoor experience, starting with where you park.
Get the 7-Zone Campsite Layout Map
Don’t let the wind ruin your setup. Join fellow campers and get the visual guide sent straight to your inbox.
🔒 100% Spam Free. Unsubscribe anytime.
Zone 1: The Sleep Zone (The Fortress)
The Goal: A quiet, weather-proof sanctuary.
New campers often pitch their tent wherever it “looks nice.” Pros pitch for the elements. When planning your campsite setup, consider the layout carefully.
Orientation: “Bum Into The Wind” Check the prevailing wind direction. You want the lowest, most aerodynamic part of your tent (usually the rear) facing into the wind. This prevents the wind from catching the door like a sail. With proper campsite setup, you can maximise your comfort and enjoyment, especially in windy coastal spots.
- In New Zealand: This is critical. The winds in alpine regions change fast.
- In Australia: It helps keep dust out of the tent zippers.
The Sun Trap Planning your campsite setup around the sun can improve comfort levels.
- Summer: Look for afternoon shade (Western side). A tent in the full 3:00 PM Aussie sun becomes an oven within minutes.
- Winter: Look for morning sun (Eastern side). There is nothing better than the sun hitting your tent at 7:00 AM to thaw out the condensation.
The Gear We Use:
- Tent: We use the Oztent RV-5 Plus because it pitches in 30 seconds. (Not sure if this is the right model for you? See our comparison of The 8 Best Family Camping Tents for Australian Summers & NZ Weather).
- Ground Sheets: Define your zone with a C-Gear Multimat. Unlike tarps, this mesh lets the sand fall through so you don’t drag dirt into bed. Investing in quality gear also contributes to a better campsite setup.
- Doormat: Place a small mat at the tent door. No shoes inside ever!
Zone 2: The Kitchen Zone (The Engine Room)
The Goal: Efficient cooking and wildlife security.
This is the busiest zone. Creating a flow in your campsite setup helps keep everything organised here.
The Wind Rule: Place your Kitchen Zone downwind from your Sleep Zone. If you fry bacon in the morning, and the wind blows the smoke into your tent, your bedding will smell like grease for the rest of the trip. Plus, food smells attract animals right to where you sleep. Think about your campsite setup as a holistic approach to camping, where one zone affects the others.
The “Triangle of Power” Set up your kitchen like a commercial workspace:
- Prep Surface: A sturdy camp table.
- Cook Surface: Your stove (on a stable stand, not the wobbly ground). Not sure which camping stove to go with? Check out my post on the Best Camping Stoves
- Storage: Your pantry or food box.
Wildlife Proofing (The K’gari Rule) Whether it’s Dingos on K’gari (Fraser Island), Possums in Victoria, or Wekas in New Zealand, animals will raid your kitchen.
- Never leave food out overnight.
- Hard Storage: We use the Oztrail 3-Shelf Cupboard to keep food zipped away and off the ground.
- The Fridge: We rely on the Dometic CFX3 55L because it holds temperature perfectly even in 40°C heat. If you are still deciding between brands, check out our guide to the Best Camping Fridges Australia. And don’t forget—you’ll need a way to keep it running off-grid, so read our review on Portable Power Station Camping Fridges, too.
Remember that your campsite setup is integral to your camping logistics, especially regarding food safety.
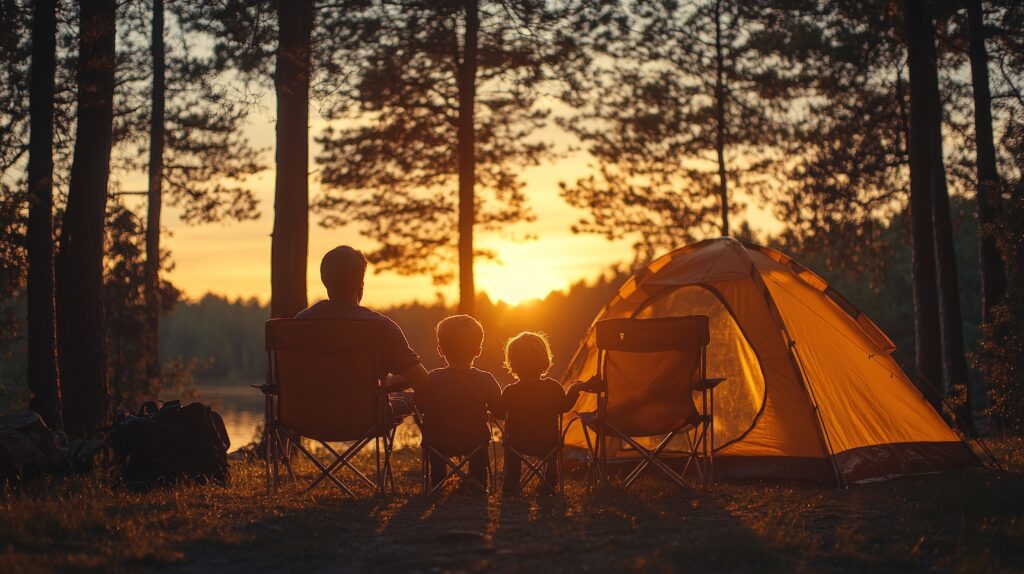
Zone 3: The Social Zone (The Living Room)
The Goal: Comfort, warmth, and conversation.
This is the heart of the campsite. Each detail in your campsite setup can impact your overall experience, and this is where you will spend the most time.
The Fire Pit Radius Consider the campfire’s placement as part of your campsite setup strategy. If fires are allowed (always check the Fire Danger Rating!), the fire pit is the center of Zone 3.
- Safety: Ensure chairs are at least 1.5 meters back. Synthetic camp chairs melt instantly if a stray ember hits them.
- Our Top Pick: We use the Snow Peak Pack & Carry Fireplace because it elevates the fire, saving the grass and leaving no trace.
Lighting the Mood Bad lighting ruins the vibe. Utilising the best practices in campsite setup can lead to greater satisfaction, and that includes lighting. Avoid harsh, cool-white floodlights that make your campsite look like a police interrogation scene.
- Our Top Pick: We use the Hardkorr 12V lighting kits, they are orange/white switchable, which is a lifesaver in bug season.
Zone 4: The Hygiene Zone (The Bathroom)
The Goal: Privacy and pollution control.
The campsite setup involves strategic planning and execution, especially when nature calls.
Distance is Key Your shower tent or Porta Potti should be located:
- Downwind from the kitchen and social zones (for obvious reasons).
- At least 50m away from any creek, river, or lake to prevent soap or waste contamination.
The Hand Wash Station This is the most forgotten item. Your campsite setup should be adaptable to different situations, but hygiene is constant. Set up a simple “tippy tap” or a water jerry can with a tap outside the hygiene tent. Safety measures are crucial in your campsite setup considerations, and stopping the spread of tummy bugs is safety rule #1.
Zone 5: The Storage Zone (The Warehouse)
The Goal: Access without clutter.
Each camping trip begins with a solid campsite setup to ensure everything runs smoothly, and that starts with your vehicle.
The “Boot Chaos” Problem Don’t let the boot become a dumping ground. Having a coherent campsite setup can greatly enhance your camping experience.
- Open Access: Park so you can easily open the boot or trailer doors. Don’t pitch the tent guy ropes across the back of the car.
- Key Safety: Have a dedicated spot (a hook or a magnetic box) where the car keys live. Losing keys in the sand is a nightmare.
- Organisation Essential: We use Sea to Summit Hydraulic Packing Cubes or clear storage tubs here. If you can’t see it, you can’t find it.
Zone 6: The Waste Zone (Leave No Trace)
The Goal: Cleanliness and animal deterrence.
With a proper campsite setup, you can enjoy the outdoors more because you aren’t fighting with rubbish blowing around.
Elevation is Everything
- The Spare Wheel Bag: If you have a spare tyre on the back of your car, this is non-negotiable. We use the Adventure Kings Dirty Gear Bag because it’s a fraction of the price of the big brands and handles the abuse just fine. It keeps the rubbish outside the car but off the ground essential for keeping the ants (and the smell) away.
- Segregation: Separate recyclables (cans/glass) from general waste. It makes disposal easier when you finally reach a town.
A proper campsite setup means more time to relax and enjoy nature, not cleaning up scattered trash in the morning.
The “Micro-Trash” Rule Keep a small tin (like an Altoids tin) in your pocket for micro-trash like cable ties, bread clips, and bottle caps. These are deadly to wildlife.
Zone 7: The Entry/Exit Zone (The Hallway)
The Goal: Safe movement day and night.
Don’t forget to consider your campsite setup as part of your overall strategy for safety. This is the path you walk between the Fire (Zone 3), the Tent (Zone 1), and the Toilet (Zone 4).
The Midnight Wee Run Take your time to perfect your campsite setup to ensure comfort and safety. Walk this path during the day and look for hazards.
- Trip Hazards: Remove loose rocks or sticks.
- Guy Ropes: Never peg a tent guy rope across a walking path. If you must, use a glow-in-the-dark peg or wrap a pool noodle around the rope so it’s visible.
- Lighting the Path: Solar garden lights are cheap and effective here. Place two or three along the path to the toilet.
The Final Tweak: The “Shake Down”
Ultimately, all good camping begins with a solid campsite setup.
Once you’ve set up your 7 zones, sit in your chair in Zone 3. Look around.
- Is the fridge accessible?
- Is the fire too close to the awning?
- Is the path to the toilet clear?
It takes an extra 20 minutes to set up using this system, but it saves you hours of frustration. Planning your campsite setup can lead to a more enjoyable experience overall.
Before you load the car, make sure you grab our Ultimate Camping Checklist for Australia & New Zealand to ensure you haven’t left the mallet (or the coffee) on the kitchen bench.
Planning your campsite setup can lead to a more enjoyable experience overall. Instead of tripping over gear and fighting with the wind, you’ll be sitting back with a cold drink, watching the sunset, knowing everything is exactly where it should be.
With careful campsite setup, you can avoid the typical camping pitfalls.
Each phase of your campsite setup should be approached with care to ensure a positive experience. If you want a cheat sheet to keep in your glovebox, grab the visual guide below. Following the 7-Zone System can streamline your campsite setup process significantly.
Ultimately, a good campsite setup leads to a more enjoyable camping trip.
Get the 7-Zone Campsite Layout Map
Don’t let the wind ruin your setup. Join fellow campers and get the visual guide sent straight to your inbox.
🔒 100% Spam Free. Unsubscribe anytime.
The Gear That Makes This System Work!
- Zone 1: Oztent RV5 (The ultimate quick-pitch touring tent).
- Zone 2: Dometic CFX3 55L Fridge (Keeps food safe and runs efficiently).
- Zone 3: Snow Peak Fire Pit (Elevated to save the grass, packs flat).
- Zone 7: Hardkorr 4-Bar Camp Light Kit (Orange light mode prevents bugs).
Find spacious campsites for this layout: → Browse Directory
Latest Posts
- Best Camping Headlamps: From Serious Gear to Panda Faces (2026)
 A dead headlamp at 11pm ruins the whole trip. We’ve filtered Amazon AU down to 6 headlamps that actually hold up in Australian conditions — including the one that already converted a real sale.
 - Winter Camping Australia 2026: The Sleep System & Layering Guide
AU winter camping done properly. The sleep system that keeps you warm at -5C, the layers that beat cotton-kills hypothermia, the AU regions and what gear they actually need. Driveway-tested, ProductReview-cross-checked.
- First Time Camping in Australia? Don’t Make These Mistakes (2026 Guide)Most first camping trips fail on systems, not gear. Generator rules, grey water, the driveway test, and what to actually pack. The honest beginner’s guide for Australian conditions.
- How to Power a CPAP Machine While Camping in Australia (2026 Guide)
Running a CPAP off-grid doesn’t need an expensive inverter setup. The right 12V cable, the right settings, and a 500Wh station will cover most people for 3–5 nights. Here’s exactly what to buy and how to set it up.
- Jackery vs EcoFlow Australia 2026: Which Power Station Is Actually Worth Your Money?
Jackery or EcoFlow? Two of the biggest names in portable power, and they take completely different approaches. One charges faster than you can pack the car. The other won’t wake the kids at 2am. Here’s the honest 2026 breakdown for Aussie families who don’t want to waste $3,000.